Under the Hood: How Breeze AI's Guardrails Actually Work
In Part 1, we made a claim: Breeze AI structurally cannot break your clients’ environments. This post backs that up with code.
If you’re a self-hoster evaluating Breeze, a contributor considering a PR, or a security auditor doing due diligence — this is for you. We’ll walk through the exact execution path of an AI tool call, from the moment a user sends a message to the moment a command reaches (or doesn’t reach) a device.
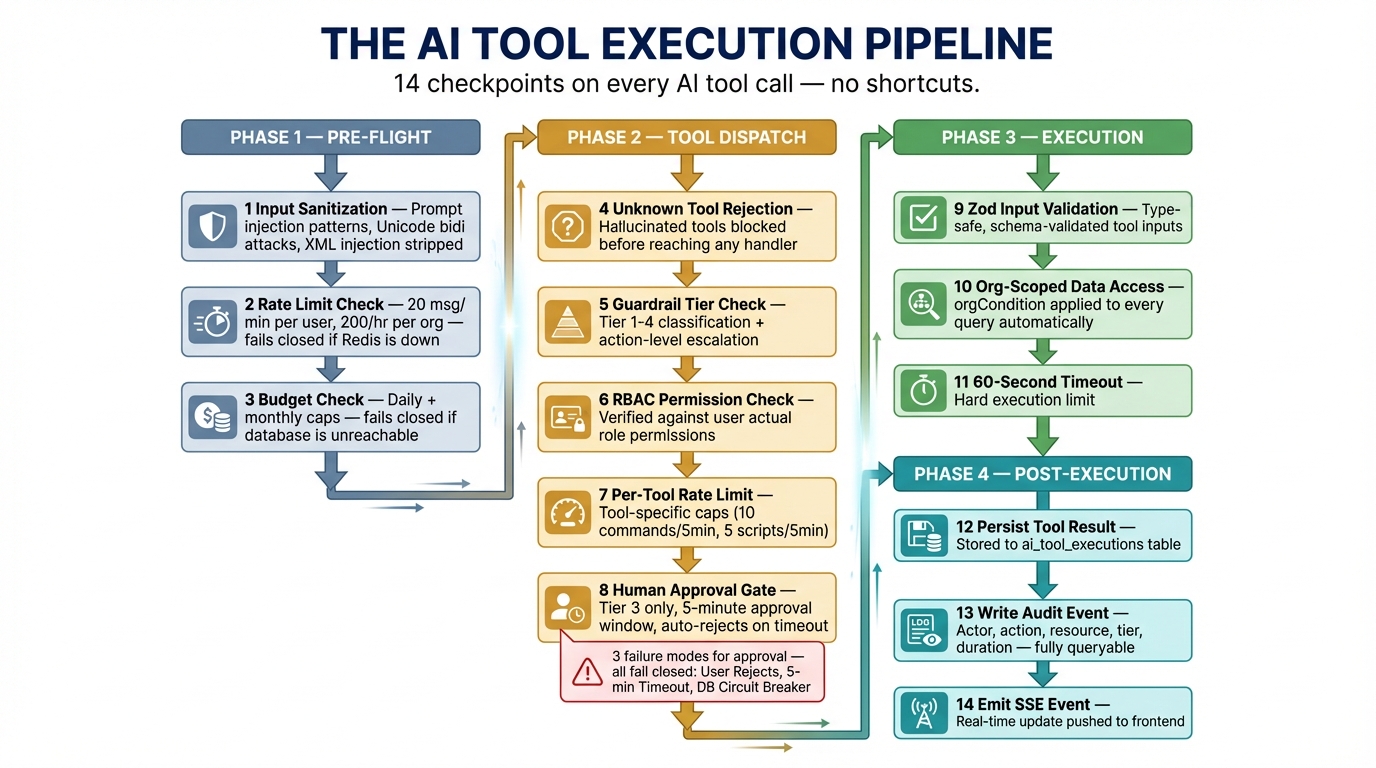
The Execution Pipeline
Every AI tool invocation passes through this pipeline. There are no shortcuts.
User message
  │
  ├─ 1. Input sanitization (prompt injection detection)
  ├─ 2. Rate limit check (per-user, per-org)
  ├─ 3. Budget check (daily + monthly caps)
  │
  ▼
Claude API (tool selection)
  │
  ▼
Tool dispatch (preToolUse callback)
  │
  ├─ 4. Unknown tool rejection
  ├─ 5. Guardrail tier check + action-level escalation
  ├─ 6. RBAC permission check
  ├─ 7. Per-tool rate limit
  ├─ 8. [Tier 3 only] Human approval gate
  │
  ▼
Tool execution (org-scoped queries only)
  │
  ├─ 9. Zod input validation
  ├─ 10. Org-scoped data access (orgCondition)
  ├─ 11. 60s execution timeout
  │
  ▼
postToolUse callback
  │
  ├─ 12. Persist tool result to DB
  ├─ 13. Write audit event
  └─ 14. Emit SSE event to frontend
That’s 14 checkpoints. Let’s examine the critical ones.
Step 1: Input Sanitization
Before anything reaches Claude, user input passes through aiInputSanitizer.ts. This isn’t a simple length check — it’s a pattern-based filter for known prompt injection techniques.
// aiInputSanitizer.ts

const INJECTION_PATTERNS: Array<{ pattern: RegExp; flag: string }> = [
  // Role impersonation
  { pattern: /\b(Human|Assistant|System)\s*:/giu, flag: 'role_impersonation' },
  { pattern: /<\|im_start\|>/giu, flag: 'chatml_injection' },

  // XML tag injection targeting system instructions
  { pattern: /<\/?system>/giu, flag: 'xml_system_tag' },
  { pattern: /<\/?instructions>/giu, flag: 'xml_instructions_tag' },

  // System prompt override attempts
  { pattern: /ignore\s+(all\s+)?(previous|prior|above)\s+(instructions|rules|prompts)/giu,
    flag: 'override_attempt' },
  { pattern: /you\s+are\s+now\s+(a|an)\s+/giu, flag: 'role_reassignment' },
  // ...
];

// Dangerous Unicode: bidi overrides, zero-width characters
const DANGEROUS_UNICODE =
  /[\u200B-\u200F\u200D\u202A-\u202E\u2060-\u2064\u2066-\u2069\uFEFF\u00AD\u00A0]/gu;
Detected patterns are replaced with [filtered], and every detection is logged to the audit trail with the specific flag. Bidi overrides and zero-width characters — common in Unicode-based obfuscation attacks — are stripped entirely.
Page context (the device/alert you’re looking at in the UI) gets the same treatment. Each field is truncated to safe lengths and run through the same injection filters. An attacker can’t inject instructions through a malicious hostname.
When sanitization flags are raised, an audit event is written:
writeAuditEvent(requestContext, {
  action: 'ai.security.prompt_injection_detected',
  resourceType: 'ai_session',
  details: { flags: sanitizeFlags, originalLength, sanitizedLength },
});
This means your security team can query the audit log for injection attempts across all sessions.
Steps 2-3: Pre-Flight Checks (Fail-Closed)
Before the message even reaches Claude, runPreFlightChecks() in aiAgentSdk.ts validates rate limits, budget, and session health. Here’s the critical design decision:
// Rate limits
try {
  const rateLimitError = await checkAiRateLimit(auth.user.id, orgId);
  if (rateLimitError) return { ok: false, error: rateLimitError };
} catch (err) {
  // Redis down? DENY the request.
  return { ok: false, error: 'Unable to verify rate limits. Please try again.' };
}

// Budget
try {
  const budgetError = await checkBudget(orgId);
  if (budgetError) return { ok: false, error: budgetError };
} catch (err) {
  // Database down? DENY the request.
  return { ok: false, error: 'Unable to verify budget. Please try again.' };
}
Both checks catch infrastructure failures and return errors. This is fail-closed: if the system can’t prove the request is safe, it rejects it. This pattern repeats throughout the entire pipeline.
Rate limits are enforced at two levels:
- Per-user: 20 messages/minute (prevents a single user from burning through budget)
- Per-org: 200 messages/hour (prevents runaway automation or compromised accounts)
Step 5: The Tier System — Action-Level Granularity
The tier system is more nuanced than “read = safe, write = dangerous.” Individual actions within a tool can escalate the tier.
// aiGuardrails.ts

// Actions that escalate to Tier 3 regardless of tool's base tier
const TIER3_ACTIONS: Record<string, string[]> = {
  file_operations: ['write', 'delete', 'mkdir', 'rename'],
  manage_services: ['start', 'stop', 'restart'],
  security_scan: ['quarantine', 'remove', 'restore'],
  disk_cleanup: ['execute']
};
The file_operations tool is registered as Tier 1 (auto-execute) because listing and reading files is safe. But the checkGuardrails() function inspects the action parameter at runtime:
export function checkGuardrails(toolName: string, input: Record<string, unknown>): GuardrailCheck {
  // ...

  const action = input.action as string | undefined;

  // Check for action-based tier escalation
  if (action && TIER3_ACTIONS[toolName]?.includes(action)) {
    return {
      tier: 3,
      allowed: true,
      requiresApproval: true,
      description: buildApprovalDescription(toolName, action, input)
    };
  }

  // ...
}
This means the AI can call file_operations with action: 'list' freely, but action: 'delete' triggers the approval gate. The escalation is checked server-side in the preToolUse callback — the AI model has no ability to bypass it.
Step 6: RBAC — The AI Can’t Exceed Your Permissions
Every tool has a permission mapping. When the AI tries to execute a command, it’s checked against the human user’s role:
const TOOL_PERMISSIONS: Record<string, ...> = {
  execute_command: { resource: 'devices', action: 'execute' },
  file_operations: {
    list: { resource: 'devices', action: 'read' },
    read: { resource: 'devices', action: 'read' },
    write: { resource: 'devices', action: 'execute' },
    delete: { resource: 'devices', action: 'execute' },
  },
  // ...
};
Notice that file reads require devices.read but file writes require devices.execute. The permission granularity follows the action, not just the tool. A read-only user’s AI session literally cannot invoke write operations — the RBAC check rejects it before the guardrail tier even matters.
Step 7: Per-Tool Rate Limits
Even approved tools have rate limits. These prevent both accidental loops and compromised sessions from causing excessive damage:
const TOOL_RATE_LIMITS: Record<string, { limit: number; windowSeconds: number }> = {
  execute_command:   { limit: 10, windowSeconds: 300 },   // 10 per 5 min
  run_script:        { limit: 5,  windowSeconds: 300 },   // 5 per 5 min
  security_scan:     { limit: 3,  windowSeconds: 600 },   // 3 per 10 min
  network_discovery: { limit: 2,  windowSeconds: 600 },   // 2 per 10 min
  disk_cleanup:      { limit: 3,  windowSeconds: 600 },   // 3 per 10 min
};
More destructive tools get tighter limits. network_discovery is capped at 2 per 10 minutes because subnet scans are resource-intensive and affect network infrastructure.
Step 8: The Approval Gate — In Detail
When a Tier 3 tool is invoked, the preToolUse callback blocks execution and enters the approval flow:
// aiAgentSdk.ts — createSessionPreToolUse()

if (guardrailCheck.requiresApproval) {
  // 1. Create a pending execution record in the database
  const [row] = await db
    .insert(aiToolExecutions)
    .values({
      sessionId: session.breezeSessionId,
      toolName,
      toolInput: input,
      status: 'pending',
    })
    .returning();

  // 2. Emit approval_required event → UI shows Approve/Reject dialog
  session.eventBus.publish({
    type: 'approval_required',
    executionId: row.id,
    toolName,
    input,
    description: guardrailCheck.description ?? `Execute ${toolName}`,
  });

  // 3. Block until human decision or timeout
  const approved = await waitForApproval(row.id, 300_000, session.abortController.signal);

  if (!approved) {
    return { allowed: false, error: 'Tool execution was rejected or timed out' };
  }
}
The waitForApproval() function polls the database with exponential backoff (starting at 500ms, capping at 3s). It has its own circuit breaker:
// aiAgent.ts — waitForApproval()

while (Date.now() - startTime < timeoutMs) {
  try {
    const [execution] = await db
      .select({ status: aiToolExecutions.status })
      .from(aiToolExecutions)
      .where(eq(aiToolExecutions.id, executionId));

    consecutiveErrors = 0;

    if (execution.status === 'approved') return true;
    if (execution.status === 'rejected') return false;
  } catch (err) {
    consecutiveErrors++;
    if (consecutiveErrors >= 5) {
      // Circuit breaker: mark as rejected and bail
      await db.update(aiToolExecutions)
        .set({ status: 'rejected', errorMessage: 'Polling failed' })
        .where(eq(aiToolExecutions.id, executionId));
      return false;
    }
  }

  await sleep(pollInterval);
  pollInterval = Math.min(pollInterval * 1.5, 3000); // Exponential backoff
}

// Timeout: auto-reject
await db.update(aiToolExecutions)
  .set({ status: 'rejected', errorMessage: 'Approval timed out' })
  .where(eq(aiToolExecutions.id, executionId));
return false;
Three failure modes, all safe:
- User clicks Reject →
false, tool not executed - 5-minute timeout → auto-rejected, tool not executed
- Database failures during polling → circuit breaker after 5 errors, tool not executed
There is no path through this function that results in an unapproved tool execution.
Step 10: Multi-Tenant Isolation
Every database query in a tool handler uses auth.orgCondition() to scope results:
// aiTools.ts — verifyDeviceAccess()

async function verifyDeviceAccess(deviceId: string, auth: AuthContext, requireOnline?: boolean) {
  const conditions = [eq(devices.id, deviceId)];
  const orgCondition = auth.orgCondition(devices.orgId);
  if (orgCondition) conditions.push(orgCondition);

  const [device] = await db.select().from(devices).where(and(...conditions));
  if (!device) throw new Error('Device not found');
  // ...
}
The orgCondition is generated from the authenticated user’s JWT claims. It’s not a parameter the AI can influence — it’s derived from the auth middleware. Even if a tool is called with a valid device UUID from another organization, the query returns nothing because the org filter excludes it.
Cost Anomaly Detection
Beyond hard budget caps, the cost tracker runs anomaly detection after every usage record:
// aiCostTracker.ts

async function checkCostAnomalies(sessionId, orgId, costCents, dailyKey) {
  // Flag if a single session exceeds 10% of daily budget
  if (session.totalCostCents > budget.dailyBudgetCents * 0.1) {
    console.warn(`[AI] Cost anomaly: session ${sessionId} ...`);
  }

  // Flag if daily spend > 80% of budget
  if (dailyUsage.totalCostCents > budget.dailyBudgetCents * 0.8) {
    console.warn(`[AI] Cost warning: org ${orgId} daily spend at 80%...`);
  }
}
This catches runaway sessions before they hit the hard limit, giving operators early warning.
Error Sanitization — Allowlist, Not Blocklist
When errors occur, the system uses an allowlist approach to decide what to show the user:
// aiAgent.ts

const SAFE_ERROR_PATTERNS = [
  /not found/i,
  /access denied/i,
  /rate limit/i,
  /budget/i,
  /permission/i,
  // ...
];

export function sanitizeErrorForClient(err: unknown): string {
  if (err instanceof Error) {
    const msg = err.message;
    if (SAFE_ERROR_PATTERNS.some(pattern => pattern.test(msg))) {
      // Strip stack traces, Windows paths, and Unix paths
      const cleaned = msg
        .replace(/\s+at\s+\S+/g, '')
        .replace(/[A-Za-z]:\\[^\s]+/g, '')
        .replace(/\/[^\s]*\/[^\s]*/g, '')
        .trim();
      return cleaned || 'An internal error occurred. Please try again.';
    }
    // Unknown error format → generic message
    return 'An internal error occurred. Please try again.';
  }
  return 'An unexpected error occurred. Please try again.';
}
This is a deliberate inversion of the common pattern. Most systems blocklist sensitive terms (like “password” or “token”) from error messages. Breeze allowlists known-safe patterns and filters everything else. Unknown errors never leak internal details.
The Full Audit Trail
Every tool execution — whether auto-executed (Tier 1-2) or approved (Tier 3) — is recorded in three places:
ai_tool_executionstable — Tool name, input, output, status, duration, who approved itai_messagestable — Full conversation history including tool_use and tool_result messages- Audit log — Standard audit event with actor, action, resource, org scoping, and tier metadata
// aiAgentSdk.ts — postToolUse callback

writeAuditEvent(requestContext, {
  action: `ai.tool.${toolName}`,
  resourceType: 'ai_session',
  details: {
    toolInput: input,
    durationMs,
    tier: guardrailCheck.tier,
    ...(guardrailCheck.requiresApproval ? { approved: true } : {}),
  },
});
The audit log is queryable through the platform and through the AI itself (via the query_audit_log tool, Tier 1). You can ask the AI “show me all tool executions from the past 24 hours” and it will surface its own audit trail.
Verify It Yourself
Every code snippet in this post is from the actual codebase. Here’s where to find them:
| File | What It Does |
|---|---|
apps/api/src/services/aiInputSanitizer.ts | Prompt injection detection and Unicode sanitization |
apps/api/src/services/aiGuardrails.ts | 4-tier system, action escalation, RBAC checks, per-tool rate limits |
apps/api/src/services/aiCostTracker.ts | Budget enforcement, rate limits, anomaly detection |
apps/api/src/services/aiAgentSdk.ts | Pre-flight checks, approval gate, audit logging |
apps/api/src/services/aiAgentSdkTools.ts | Tool definitions, pre/post callbacks, execution timeout |
apps/api/src/services/aiAgent.ts | Approval polling with circuit breaker, error sanitization |
Clone the repo. Read the code. If you find a gap, open an issue — or better yet, a PR.
This is Part 2 of the Breeze AI Safety & Capabilities series. Previous: Why Breeze AI Can’t Break Your Clients’ Environments · Next: What Breeze AI Can Actually Do For Your Help Desk